WordPress Installation is a simple process, but sometimes users have different questions about it. In order to help our customers to avoid any difficulties, we have prepared the detailed manual about WordPress installation. If you don't have hosting, you may choose one of this:
Hostgator,
Bluehost,
Mediatemple,
Siteground,
WPengine. These hostings have maximum compatibility with our themes and using them you will avoid various issues. If you already have hosting, please contact your web hosting service provider to make sure that your server complies with these requirements:
WordPress 4.5 or higher,
PHP 5.6 or higher, and
mysql 5.6 or higher. Such requirements are highly necessary for using this theme.
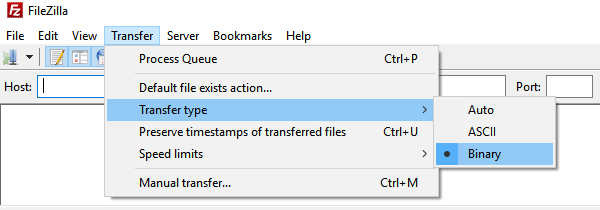
When download process is finished, it is necessary to upload new WordPress release to your web hosting. You may do this via File Manager in you web-hosting control panel, such as CPanel, or via FTP Manager like FileZilla Please upload all files via FTP using only binary mode. This is the guarantee of proper transferring all files via FTP to your hosting:
2. Upload the archive with actual WP version to your server in your public_html directory. Unpack it via File Manager in your CPanel. In different hostings public_html folder have other accordant name. All folders and files must be in the public_html directory like on the screenshot below:
Just in case we have prepared for you another method to upload and unpack WordPress archive to your hosting:
1. Copy the php code below between two lines and paste this code to .txt file named zipper. Change extension of zipper.txt file to zipper.php.
<?php
/* Simple script to upload a zip file to the webserver and have it unzipped
Saves tons of time, think only of uploading Wordpress to the server
Thanks to c.bavota (www.bavotasan.com)
I have modified the script a little to make it more convenient
Modified by: Johan van de Merwe (12.02.2013)
*/
function rmdir_recursive($dir) {
foreach(scandir($dir) as $file) {
if ('.' === $file || '..' === $file) continue;
if (is_dir("$dir/$file")) rmdir_recursive("$dir/$file");
else unlink("$dir/$file");
}
rmdir($dir);
}
if($_FILES["zip_file"]["name"]) {
$filename = $_FILES["zip_file"]["name"];
$source = $_FILES["zip_file"]["tmp_name"];
$type = $_FILES["zip_file"]["type"];
$name = explode(".", $filename);
$accepted_types = array('application/zip', 'application/x-zip-compressed', 'multipart/x-zip', 'application/x-compressed');
foreach($accepted_types as $mime_type) {
if($mime_type == $type) {
$okay = true;
break;
}
}
$continue = strtolower($name[1]) == 'zip' ? true : false;
if(!$continue) {
$message = "The file you are trying to upload is not a .zip file. Please try again.";
}
/* PHP current path */
$path = dirname(__FILE__).'/'; // absolute path to the directory where zipper.php is in
$filenoext = basename ($filename, '.zip'); // absolute path to the directory where zipper.php is in (lowercase)
$filenoext = basename ($filenoext, '.ZIP'); // absolute path to the directory where zipper.php is in (when uppercase)
$targetdir = $path . $filenoext; // target directory
$targetzip = $path . $filename; // target zip file
/* create directory if not exists', otherwise overwrite */
/* target directory is same as filename without extension */
if (is_dir($targetdir)) rmdir_recursive ( $targetdir);
mkdir($targetdir, 0777);
/* here it is really happening */
if(move_uploaded_file($source, $targetzip)) {
$zip = new ZipArchive();
$x = $zip->open($targetzip); // open the zip file to extract
if ($x === true) {
$zip->extractTo($targetdir); // place in the directory with same name
$zip->close();
unlink($targetzip);
}
$message = "Your .zip file was uploaded and unpacked.";
} else {
$message = "There was a problem with the upload. Please try again.";
}
}
?>
<!DOCTYPE html PUBLIC "-//W3C//DTD XHTML 1.0 Transitional//EN" "http://www.w3.org/TR/xhtml1/DTD/xhtml1-transitional.dtd">
<html xmlns="http://www.w3.org/1999/xhtml">
<head>
<meta http-equiv="Content-Type" content="text/html; charset=UTF-8" />
<title>Unzip a zip file to the webserver</title>
</head>
<body>
<?php if($message) echo "<p>$message</p>"; ?>
<form enctype="multipart/form-data" method="post" action="">
<label>Choose a zip file to upload: <input type="file" name="zip_file" /></label>
<br />
<input type="submit" name="submit" value="Upload" />
</form>
</body>
</html>
2. Upload zipper.php via FTP or File Manager through CPanel to public_html directory.
3. Then open in your browser the following link: http://your-domain.com/zipper.php and you will receive the result like on the screenshot below:
4. Select wordpress.zip from your local PC and click "Upload" button. Then you will receive this message:
5. Move unpacked files and folders from WordPress directory to your public_html directory:
6. For better security please delete file zipper.php from your public_htm after all these steps.
7. Open in your browser the following address: http://your-domain.com/ and you will see the beginning of WordPress installation. Choose you language and click "Continue":
8. In our case we have created database in PhPMyAdmin and now you may click "Let's go!":
9. Fill the required information for database. As you remember, we have prepared database and username via PhPMyAdmin in the previous steps:
10. Click "Run the install" and wait for a few seconds:
11. Fill necessary information like on the screenshot below. Click "Install WordPress":
12. After installation process is finished, you will see the following message:
13. Use your username or email and password in order to log in WordPress Dashboard:
14. Our congratulations, WordPress installation is finished and now you are logged in WP Dashboard! Now we can start Theme Installation. Please visit the next topic Theme and Demo Content Installation.
We also encourage you to actively use the links below. These useful resources cover most of general WordPress questions you may have:
-
-
-
Wordpress FAQ - Information and resources about WordPress including history, features, semantics, glossary and information to help you determine whether or not WordPress is the blogging tool for you.
-
-
-
-
-